Modtub Set UpUpdated 5 months ago
The tub contains the parts box and the chiller box.
In the parts box you find:
- Pump box
- Filter box
- 4 hoses
- Accessory box
1. Take the black elbow valve fitting found in the accessories box and screw it into the drain fitting on the side of the tub.
2. Hang the filter assembly on the two screws on the backside of the tub.
3. Remove the pump from its box and place it on the ground behind the tub with wire coming out of the side on the right on the pump.
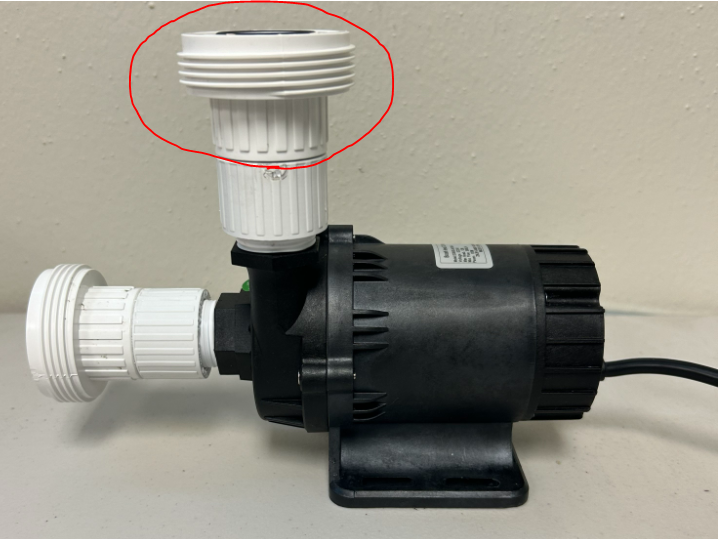
4. Take Hose 1 and screw the black fitting into the bottom fitting on the drain side of the tub. You may need to twist it slightly to orientate it correctly. Then screw the white fitting into the intake of the pump. Make sure the wire is on the right side of the pump.

5. Take Hose 2 and screw it into the top output of the pump and into the intake (right) of the filter.
6. Take Hose 3 and screw the white fitting into the filter output (left).
7. Remove the chiller from its box and position it on the drain side of the tub. Screw the black fitting of Hose 3 into the chiller intake (back).
Note: Your chiller may come with a bag of fittings. Feel free to throw them away as they are not needed.
8. Take Hose 4 and screw the black fitting into the chiller output (front). Then screw the gray fitting into the tub. You will need to reposition the chiller to line up with the tub fitting.
10. Plug the wire connected to the pump into the connector sticking out of the bottom of the electrical box. Then plug the wire coming out of the chiller into an open outlet inside the electrical box.
11. Attached the pre-filter found in your Accessories box to your water hose. Run the water for a second to clear out any excess charcoal before filling your tub. Begin filling your tub with water. We recommend filling it to about an inch above the water return, but that is up to your preference.
12. Plug the GFCI cord into an outlet. Press the “reset” button to the GFCI plug to reset. The pump might take a few seconds to purge the air in the lines before circulating water. (The “test” button can be used to power down the unit and “reset” to power up)
14. Flip the green switch on the side of the chiller. To adjust the temperature of the chiller, simply press the “set” button, then use the up or down arrows to get to your desired temp. Press “set” again to lock in the temp. Make sure the “boost” is set to “24/7”. The temperature drops an average of 3 degrees per hour. The chiller will drop the water down to the set temperature, then go into rest mode. Once the temperature rises by 3 degrees, the chiller will turn back on and drop the water down to the set temperature again. (E.g. if the chiller is set to 39 degrees, temperature reading will stay between 39 and 42 degrees).
15. Once you have the tub powered on, check to make sure you have water flow into the tub by placing your hand in the water, in front of the water output hole. (top hole in tub) If you don’t feel water flow coming into the tub, or it is a weak flow, please refer to our troubleshooting guide on the Help Center of our website. Your chiller WILL NOT chill the water if the flow is impeded. You can adjust the power of your pump with the small knob sticking out of the bottom of the electrical box. We recommend about 50% power.
Notes:
If the water temperature in the tub does not match the temperature readout on the chiller, proper flow might be impeded. This is almost always caused by one of the two valves being closed or the filter being clogged. A filter change is needed at this point.
The L-fitting on the drain side of the tub has a shut-off valve. Make sure this is open when operating the pump.
The filter housing has a shutoff valve that allows the filter to be changed without draining the water. To do this, turn the power off, then pull the lever on the right side of the filter towards you. Use the included plastic wrench to remove the filter housing. After changing the filter and screwing the housing back into place, be sure to put the lever back in the downwards position before turning the power back on. Note: Make sure the O-ring stays in place when you screw the filter housing back in.
To drain the water from the tub, attach the included black fitting found in the Accessories box to the inside of the tub output hole. Make sure you screw the correct side into the hole, as the sides have different threads. The narrower threads go inside the tub fitting. Turn the power off temporarily, then attach a standard garden hose to the fitting. Turn the power back on, and the water will be pumped out through the hose.
If your chiller is leaking out of the bottom, the fittings on top of the chiller need to be tightened.